10 Essential Steps For Emergency Water Damage Restoration
When water damage hits, minutes matter. Clean water turns grey as microbes grow, and hidden cavities wick moisture into timber, insulation, and wiring. A calm, ordered response limits loss and speeds insurance decisions. Use these steps to handle the first day and to prepare for professional emergency water damage restoration that dries, cleans, and prepares the space fit to reoccupy. Consider every hour as a chance to minimise secondary harm and maintain the availability of repair choices. Simple decisions now can save flooring, skirting, and furniture later.
1. Make The Area Safe
Avoid bent walls and bulging ceilings, and turn off the electricity in the impacted areas. Keep children and pets away. If the source is a burst pipe, shut the main valve, then capture photos and short videos before you move items. Clear safety lets you act quickly without risking shocks or structural failure.
2. Stop The Source And Stabilise
Locate the cause and close it down. Isolate a faulty appliance, cap a split hose, or call a plumber for pressure lines. If the weather drives the event, cover openings with tarps and tape. Stabilisation limits further water damage and gives contractors a defined starting point for extraction and drying.
3. Call Your Insurer And Log Evidence
Report the incident early and ask about approved vendors and documentation. Record meter readings, keep a timeline, and save receipts for pumps, fans, and tarps. Photograph contents and serial numbers. Clear evidence supports claims and aligns your file with the emergency water damage restoration plan that follows.
4. Remove Standing Water Safely
Use wet vacs and pumps with proper electrical protection. Shove water to a low point for capture, not towards clean rooms. Lift rugs and move lightweight furniture onto blocks. Avoid pushing water into wall voids or under plates. Fast extraction reduces microbial growth and shortens the drying schedule.
5. Protect Contents And Prioritise
Move clean items to a dry, ventilated area. Separate porous items like books and textiles from hard surfaces. Freeze valuable documents in sealed bags for later drying. Tag fragile pieces and photograph their condition. Prioritisation preserves what matters while crews set up the wider emergency water damage restoration work.
6. Establish Airflow And Dehumidification
Use fans to break the boundary layer on wet surfaces, then run dehumidifiers to capture moisture from the air. Check and empty tanks regularly. Airflow without dehumidification can spread moisture, so keep a balance that moves vapour towards capture.
7. Inspect Hidden Cavities And Floorings
Moisture hides behind skirting, within insulation, and under floating floors. Use a moisture meter if available, or look for staining and odour. Pop off skirting where swollen and lift a board at thresholds to check subfloors. Early discovery prevents concealed water damage from seeding mould that extends timelines and costs.
8. Separate Salvage From Strip-Out
Plasterboard, particleboard, and saturated insulation often need removal. Solid timber and masonry can dry with the right plan. To maintain clean zones, label trash and anything that cannot be saved. Keep a simple inventory so replacement schedules and budgets remain clear once restoration moves into rebuild.
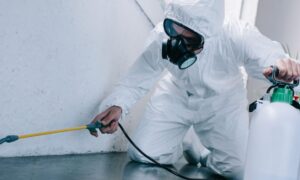
9. Clean With HEPA And Detergent
After extraction, remove residue and spores. HEPA vacuum dry debris, then wipe hard surfaces with mild detergent. Change clothes often and work from clean to dirty areas. Bleach does not penetrate porous materials and can harm fibres, so avoid using it on them. Prepared surfaces dry faster and accept coatings reliably.
10. Plan Professional Drying And Verification
Ask specialists for moisture mapping, daily meter logs, and a clear drying target for each material. Expect negative air or containment if mould is present. Verification closes the loop: technicians confirm moisture levels, replace filters, and document that materials meet standard. Good records support insurance and future resale.
Conclusion
Speed with the method saves the most. Make the area safe, stop the source, and document. Extract, protect contents, and balance airflow with dehumidification. Check hidden cavities, separate salvage, and clean correctly. Then bring in qualified teams to measure, dry, and verify. Careful emergency water damage restoration turns a disruptive event into a controlled recovery with fewer surprises later. Keep a simple log to coordinate trades and avoid unnecessary costs.
Contact BELFOR to schedule rapid extraction, moisture mapping, and a documented drying plan with daily meter logs and independent clearance, so your property returns to safe, dry, and verifiable condition.